Team
Overview
The Team page is where you manage who can sign in to your PTA unit on FutureFund Connect. Anyone listed here has access to your unit so they can view information, and — depending on their access level — complete tasks and make changes.
Open Team from the navigation bar under your unit’s name.
Adding someone to your Team is separate from adding them to your board roster. The board roster records your unit’s leadership; the Team controls who can actually sign in. In most cases you will want your board members on the Team too, so they can log in and take care of their responsibilities.
A quick note about the Role field
When you add someone, you give them a Role such as President, Treasurer, or Parliamentarian. It does not control what they can see or do — that’s what Access Level is for (see below).
What it does control is where tasks go. When a task’s approval chain reaches your unit, Connect looks for a Team member whose Role label matches the step’s configured role. So a task meant for the treasurer arrives in the right inbox because someone here is labelled Treasurer.
That makes it worth a minute of care: label people with the position they actually hold, and update the labels when your board changes. To learn more, see Roles and Permissions.
Member or Viewer?
Every person you invite gets one of two access levels:
- Member — can view everything and make changes (add, edit, delete, submit).
- Viewer — can view everything but can’t make any changes. Edit, delete, and create buttons are hidden for Viewers.
Choose Viewer for someone who just needs to see what’s going on — a new board member getting oriented, or a parent who wants visibility without the ability to change records. Viewers can still star Favorites and follow tasks for notifications.
On the Team list, Viewers carry a small Viewer badge next to their name; everyone else is a Member.
Inviting Someone to Your Team
- Open your unit’s Team page.
- Click Invite User.
- Enter the person’s Name (their full name).
- Enter their Email Address.
- Enter a Role (for example, President or Treasurer).
- Choose an Access Level: Member or Viewer.
- Click the save button to send the invitation.
The person will receive an email with a link to set up their account, or to connect to their existing FutureFund account if they already have one. Until they accept, their status will show as Invited.
A note about shared inboxes
Many PTAs use shared email addresses like president@yourpta.org that get handed off from person to person. If the email you enter already belongs to a FutureFund account under a different name, we still add that person to your Team — you’ll just see a message explaining that the account already exists under its current name. Only that person can change their own name, by signing in and updating their profile.
Understanding Invitation Statuses
Each person’s status appears next to their name on the Team page:
- Invited — The invitation has been sent and is waiting to be accepted.
- Accepted — The person has accepted and can now sign in.
- Expired — The invitation was not accepted within 7 days.
- Blocked — We were unable to deliver email to this address.
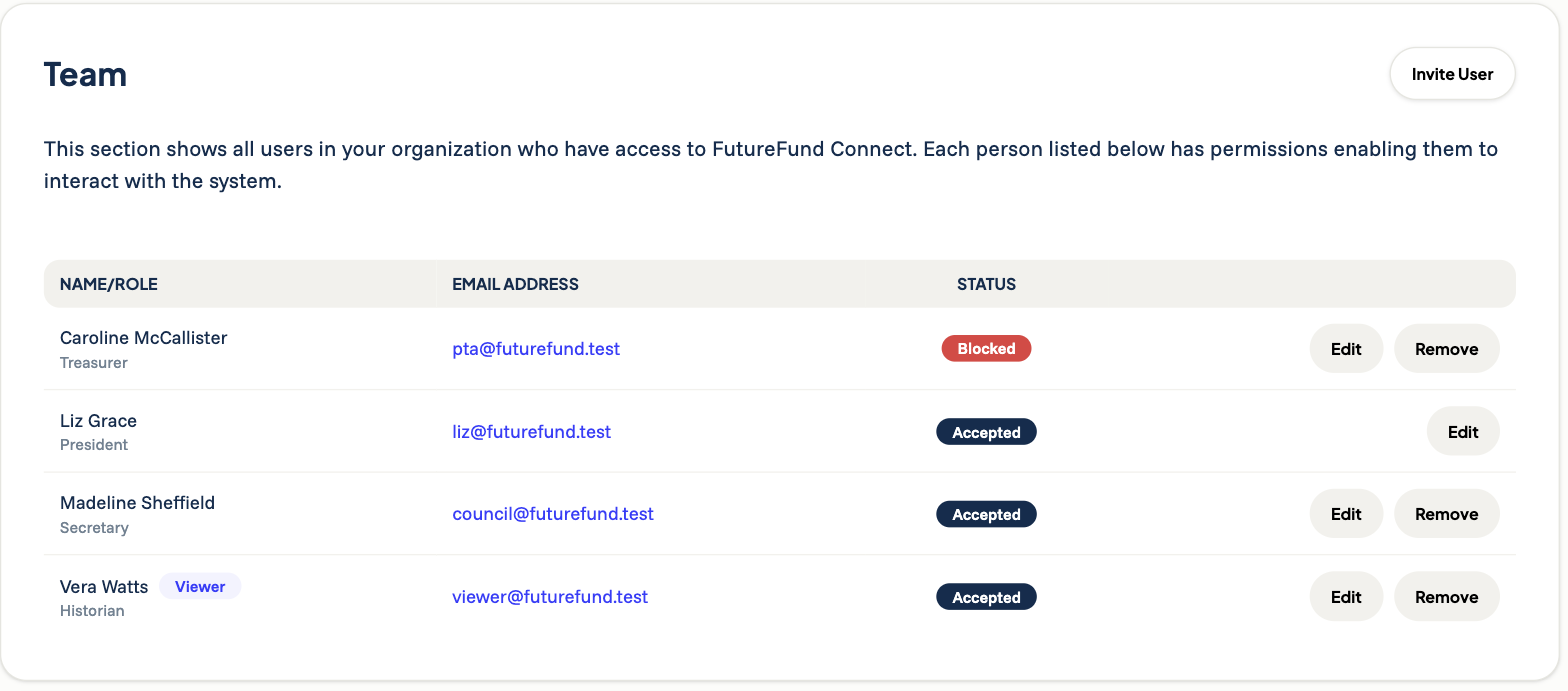
A few things worth noticing in the list above: the Viewer badge marks read-only access, the row for the person currently signed in has no Remove button, and a Blocked row has no Resend button.
If an invitation expired or was not received
If someone has not accepted yet, click Resend next to their name to send the invitation again. This gives them a fresh link and resets the 7-day window.
If the email address itself is wrong, resending won’t help — remove the permission and re-invite the person with the correct address. An invitation’s email address can’t be edited after the fact.
For help with what your invited team member sees on their end, share our guide on Accepting Your Invitation & Setting Up Your Account.
If someone shows as Blocked
A Blocked status means we could not deliver email to that address (for example, because the inbox bounced our messages). Hover over the red badge to see the note. The Resend button is hidden for blocked people, because resending would only bounce again — please contact our support team, who can clear the block and resend for you.
Before you write in, double-check the spelling of the address. If it’s simply wrong, inviting the correct address is the faster fix.
If someone forgot their password
There is no “reset password” button on this page, and that’s intentional — nobody can set a password for someone else. Passwords belong to each person’s own FutureFund account.
If their status reads Accepted but they can’t get in, they need to reset it themselves from the sign-in screen. Point them to Resetting Your Password.
If their status reads Invited or Expired, it isn’t a password problem at all — they never finished setting up. Click Resend.
Updating a Team Member
You can update the Role label and Access Level for anyone on your Team.
- On the Team page, click Edit next to the person’s name.
- Update their Role and/or Access Level.
- Save your changes.
You cannot change a team member’s name or email address from here. Those belong to the person’s own account. If they need to be changed, ask the team member to update their profile.
Removing a Team Member
To take away someone’s access to your unit, click Remove next to their name and confirm.
A couple of things to know:
- You cannot remove yourself from the Team.
- You cannot remove a FutureFund administrator. If a removal option is not shown for someone, it is because one of these rules applies.
Setting a Default Assignee
Your unit’s Edit page has a setting for the default person assigned to new tasks. It catches anything that doesn’t match a role label, so a task never lands on an unexpected person. It’s worth setting once.
Tips
- After you update your board roster, remember to invite any new board members to the Team so they can sign in — the Add to Team button on a board member’s record does this in one click.
- Check for Invited statuses now and then. If someone has not accepted, reach out to them and click Resend.
- Remove team members promptly when they leave the board, so only current volunteers have access. Update their role labels at the same time so tasks follow the new officers.
- Team access is per-unit. If a volunteer serves more than one unit, they need to be invited to each unit’s Team separately — unless they have council, district, or state access, which reaches down automatically.
- Use Viewer access for anyone who should see your unit’s information without being able to change it.
- For added security, team members can turn on two-factor authentication from their own FutureFund account settings.
Was this helpful?